
Using Removable Drives and Media
Accessing Removable Media
Before we talk about managing removable media, we need to explain the terms mount, unmount and eject. The Unix file system treats all drives and media as files, albeit a special type of file. In order to be able to access the files on a particular medium, you must first mount the device. This can be accomplished through the command line with the mount command or through a file manager like Thunar. When a drive is mounted, it gets attached to the file system as a sub-directory; e.g., as /media/username/device-name. The files on the medium can then be accessed just like any other files and folders in the file system. If you want to mount a drive from the command line, you must first run a command to determine its device name. Fortunately, this is not necessary in Thunar. As soon as a removable device is inserted or plugged in, its name will show up in the Side Pane under the Devices section. It can optionally be mounted and opened automatically—see the Managing Removable Drives and Media paragraph below for details on how to configure those options.
You can see the current mount status of a device by looking at its icon in the Side Pane. The icons of unmounted drives are greyed out. See the example below for a comparison. You can also right-click on a device and the context menu will offer an option to either Mount or Unmount, depending on the current status.
| Removable Media in Side Pane: Unmounted (First), Mounted (Second), Right-click Menu (Third) |
|---|

|
To mount a device, simply click on its name in the Side Pane and it will be mounted and opened, its contents being displayed in the Main Area. You can also mount a device without opening it by using the right-click menu.
If any changes are made to the files on the removable medium, care must be taken to make sure all of the changes have been written to the device before it is removed. This is done by unmounting or ejecting the medium. The differences between the two are as follows:
- Unmount—files on the device are closed and no longer appear in the Main Area but the device still shows in the Side Pane
- Eject—files on the device are closed and no longer appear in the Main Area and the device is no longer shown in the Side Pane. Also, for devices like optical drives, the disc will be ejected from the drive.
If you have a notification daemon installed and enabled and you try to unmount or eject a device while data is still being written to it, you will receive a popup notification like the example below.
| Removal Notification |
|---|

|
In that case, you should wait until the notification disappears and the medium's icon in the Side Pane either dims or disappears (depending on whether you unmounted of ejected). At that point it should be safe to remove the medium or disconnect the drive.
Be aware that you cannot eject or unmount media that are still in use by one or more applications. Therefore if the file manager refuses to eject media, make sure you close all applications that were accessing the media, and be sure to also check command line applications running in Terminal windows.
Managing Removable Drives and Media
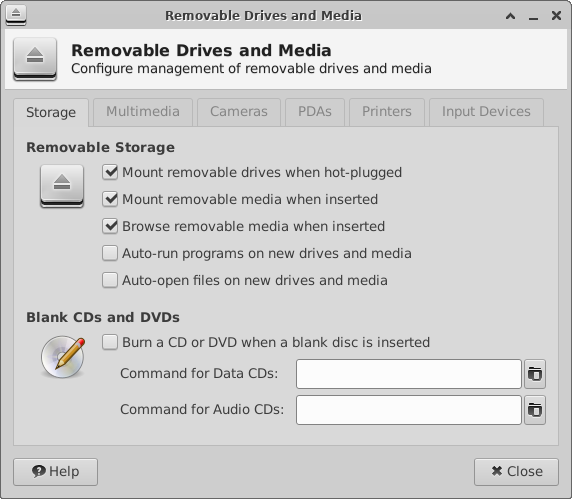
Thunar is able to automatically manage removable drives and media if the thunar-volman package is installed on your system. To enable this feature, open the file manager Preferences, go to the Advanced tab and check the Enable Volume Management box in the Volume Management section. Finally, click on the Configure link right below that. The Removable Drives and Media configuration dialog shown below will be displayed. The tabs in this dialog are organized by device categories to make it easy to locate the options for your specific device.
| Removable Drives and Media |
|---|
|
There are two expansion characters you can use in the “command” entries in all device categories.
| %d | device file |
| %m | mount point |
Storage tab
Removable Storage
The Removable Storage section of the Storage tab contains the most important options of the entire dialog. The options are described in detail below.
- Mount removable drives when hot-plugged
- Enable this option to automatically mount removable drives (e.g., external hard drives or USB sticks) when such drives are plugged into the computer. This option must be enabled in order for most of the other options in this dialog to work with removable drives. For example, if this option is unchecked, Browse removable media when inserted will be ignored.
- Mount removable media when inserted
- Enable this option to automatically mount removable media (e.g., CDs or DVDs) in the file manager. As with the previous option, most other features in this dialog require this option to be enabled. For example, Play audio CDs when inserted (under the Multimedia tab) will not function unless this option is enabled.
- Browse removable media when inserted
- Enable this option to automatically display the contents of newly inserted drives or media in the Main Area of the file manager. Note however, that the contents will only be displayed if no other action was called for or you choose to ignore the other possible actions. For example, if you insert a CD-ROM with auto-run capabilities and the Auto-run programs on new drives and media option is enabled, you will be prompted whether you want to allow or ignore the auto-run. If you choose to ignore the auto-run, the contents will then be displayed in the file manager.
- Auto-run programs on new drives and media
- Enable this option to make use of auto-run capabilities of certain removable drives and media. See the Desktop Application Autostart Specification for details about the auto-run mechanism. As a security precaution, you will always be prompted to confirm the auto-run (see the example below).
- If the Windows emulator WINE is installed on your system, the auto-run mechanism will also try to run
autorun.exefiles using WINE. - Auto-open files on new drives and media
- Enable this option to make use of auto-open capabilities of certain removable drives and media. See the Desktop Application Autostart Specification for details about the auto-open mechanism. As a security precaution, you will always be prompted to confirm the auto-open (see the example below).
| Auto-Run and Auto-Open Confirmation Dialogs |
|---|


|
Blank CDs and DVDs
Enabling Burn a CD or DVD when a blank disc is inserted allows you to save the step of manually launching a burning application whenever you insert a blank, writable disc. Once this box is checked, you can add an appropriate command—including parameters to specify the type of composition—to call the burning application of your choice. Consult the help files of your chosen application for supported commands and parameters. When the blank disc is inserted, one of the following confirmation dialogs will appear, depending on the type of disc detected:
| Blank Disc Inserted - Confirmation Dialogs |
|---|


|
In the case of a blank CD, you are presented with separate buttons for choosing a Data or Audio composition type. Choosing the Burn Data CD button will execute the command you entered in the Command for Data CDs: field. The Burn Audio CD button will run the Command for Audio CDs:.
If you have inserted a blank DVD, you will only see a Burn DVD button. Choosing this will execute the command entered in the Command for Data CDs: field.
Multimedia tab
As with the Blank CDs and DVDs choices under the Storage tab, the three options under the Multimedia tab offer shortcuts to the actions to be performed when these media or devices are inserted or plugged in. The syntax of the commands that can be entered here (along with those on the Cameras, PDAs, Printers and Input Devices tabs) is beyond the scope of this document. The screenshot below shows a couple of possibilities, but you will need to consult the application help files or device user guides in question for the others.
| Multimedia Tab |
|---|

|