
Using the application - xfce4-screenshooter
Via the user interface
To launch the application, use the Screenshot item in the Accessories category of Xfce's main menu.
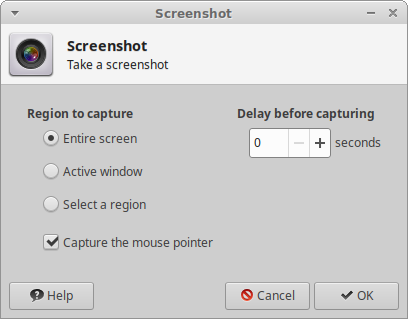
Take a screenshot
| Take a screenshot |
|---|
|
Region to capture
The Region to capture section allows you to set what the screenshot will be taken of: ? Entire screen ! Takes a screenshot of the whole screen as you see it. ? Active window ! Takes a screenshot of the active window. This will be the one that was active before this dialog appeared, or if you set a delay, the one that is active after the delay. ? Select a region ! Allows you to select a region to be captured by clicking and dragging a rectangle over the area of screen that you wish to capture, before releasing the mouse button. You can also press Ctrl while dragging to move the rectangle. ? Capturing the pointer ! The Capture the mouse pointer option allows you to select whether or not the screenshot will include the mouse pointer.
Delay before capturing
The Delay before capturing section allows you to set the delay that will elapse between pressing the OK button and screenshot being taken. This delay will allow you to open menus or to perform whatever action you require to see displayed in the screenshot.
After capturing
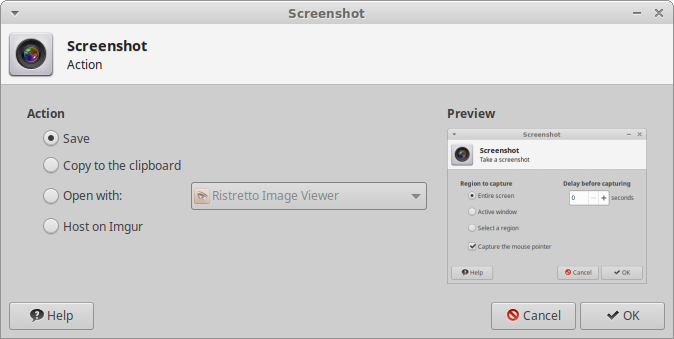
After pressing the OK button a second window will be displayed:
| Action |
|---|
|
Preview
The Preview section displays a thumbnail of the screenshot.
Action
The Action section allows you to choose what should be performed on the screenshot.
? Save ! The Save option will save the screenshot to a PNG file. A save dialog will be displayed. You will be able to set the save location, and the name of the file. ! Xfce4 Screenshooter is also able to save the screenshot to any remote file system supported by GVfs, such as FTP, SAMBA, SFTP, remote computers accessible via SSH… You just need to connect this remote file system using gvfs-connect or Gigolo and it will be available in the left column of the save dialog. ? Copy to the clipboard ! The Copy to the clipboard option allows you to paste the screenshot in another application, such as a word processor. This option is only available when a clipboard manager is running. ? Open with ! The Open with option saves the screenshot to the system's temporary directory and opens it with the application chosen from the drop-down list. Applications which support images are automatically detected and added to the drop-down list. ? Host on Imgur ! The Host on Imgur option allow you to host your screenshot on this free online hosting service, so that you can share it easily with other people. Imgur automatically generates a tiny, medium, and full-size image of your screenshot, which can be used to create thumbnails pointing to the full size screenshot.
Host on Imgur
After selecting Host on Imgur and pressing the OK button, you will be shown this dialog:
| Imgur image link |
|---|
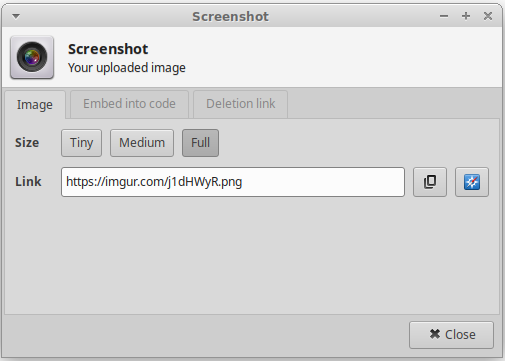
|
The dialog below will give you the links to the full size screenshot, the large thumbnail, the small thumbnails, as well examples of HTML, Markdown and BBcode to create a thumbnail pointing to the full size screenshot:
| Imgur Embed into code dialog |
|---|
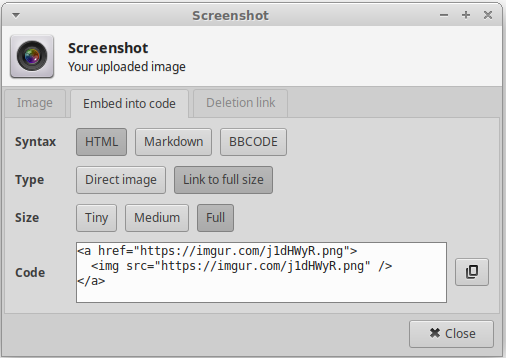
|
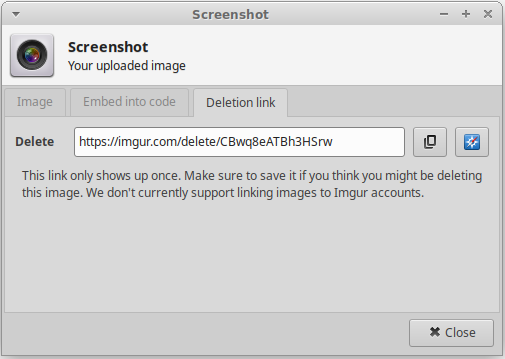
The dialog below will give you the links to delete the image off of the Imgur website. The link will only be shown once. Make sure to save it if you think you might be deleting this image:
| Imgur deletion dialog |
|---|
|
Linking images of Imgur accounts is not currently supported.
Via command-line
Command line options allow you to take screenshots quickly. They also allow you to configure the Print Screen key on the upper right of most keyboards so that it takes screenshots. To do so, configure the key-bindings of your desktop environment so that it launches xfce4-screenshooter with one or several of the following options when the Prt Scrn key is pressed.
The command line options
? The -w option ! The -w option allows you to take a screenshot of the active window. ? The -f option ! The -f option allows you to take a screenshot of the entire screen. ? The -r option ! The -r option allows you to select a region to be captured by clicking and dragging a rectangle over the area of screen that you wish to capture, before releasing the mouse button. ? The -d option ! The -d option followed by a positive integer allows you to set the delay before taking the screenshot when the -w, the -f or the -r option is given. ? The -s option ! The -s option followed by the path to an existing folder allows you to set where the screenshots are saved. This option only has an effect if the -w, the -f or the -r option is given. ? The -o option ! If the -o option is given, followed by an application name, the screenshot will be saved to the system's temporary directory and opened with the application whose name is to be given after -o. This option only has an effect if the -w, the -f or the -r option is given. ? The -u option ! If the -u option is given, the screenshot will be hosted on Imgur. See above for more details. This option only has an effect if the -w, the -f or the -r option is given.