Using xfdesktop
Background
Xfdesktop is responsible for drawing the desktop's backdrop (sometimes called “wallpaper”) image. There are various options for setting a backdrop image. The final picture seen on the monitor is composed of a solid color or gradient, with an image or photo (with optional transparency) composited on top of the color or gradient. This allows for some interesting effects using semi-transparent images on top of various color arrangements.
You can easily change your desktop backdrop by clicking on the Desktop button in the Settings Manager, or alternatively, right clicking your desktop and selecting the Desktop Settings... option.
| Customizing desktop settings |
|---|
 |
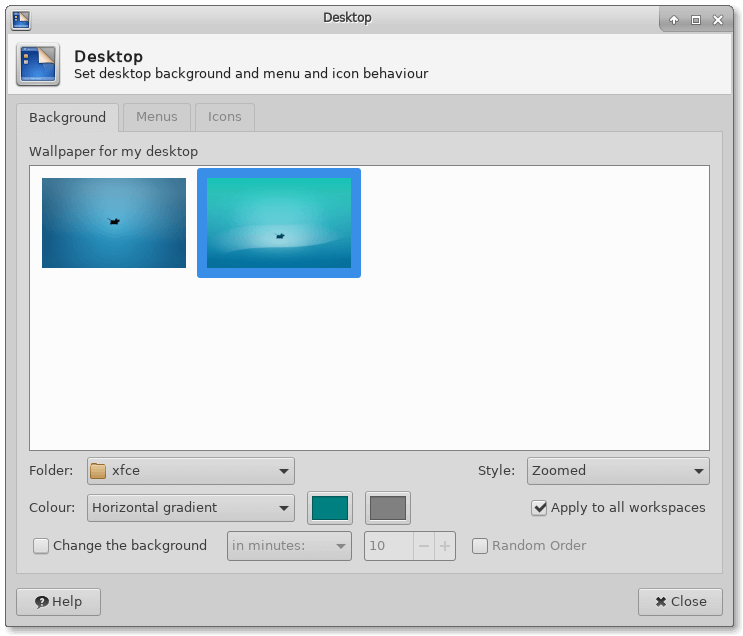
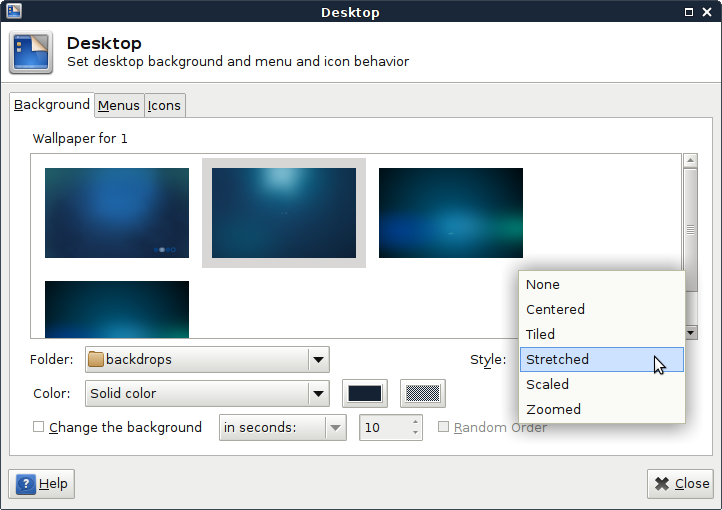
Once the Desktop settings dialog is open, the Background tab gives you options for configuring the look of your desktop background. You can choose to use a single image or multiple images as wallpaper or you can use a color scheme. If you use an image but don't want it to fill the entire screen, you can combine it with a color scheme to fill in the rest of the background. The default is to use a wallpaper image and the list of default images available can be found in the Wallpaper for my desktop pane.
If you tick the Apply to all workspaces option, the defined wallpaper image will be applied to all the workspaces on your computer. If you want to set different images to specific workspaces all you have to do is to untick this option and move the Desktop dialog to the desired workspace.
| Customizing desktop settings for specific workspaces |
|---|
 |
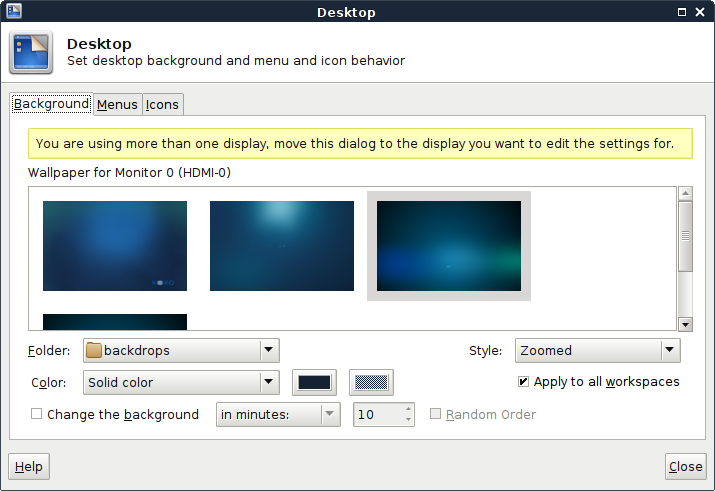
Xfdesktop supports xinerama and multi-monitor setups. With more than one display/monitor connected, the Background tab always reflects the monitor that the dialog is currently displayed on, this way, each monitor can have its own settings. Move the dialog to the monitor you want to edit the settings for.
| Customizing desktop settings for multiple monitors |
|---|
 |
Images
| Selecting desktop backdrop |
|---|
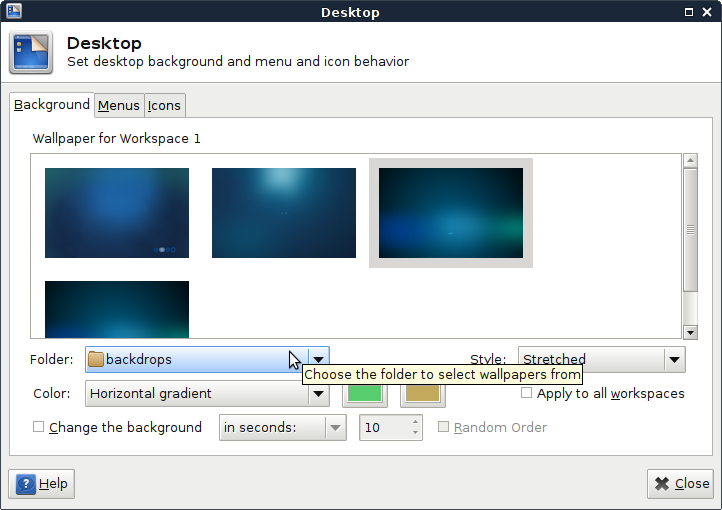 |
To set or change the wallpaper image, simply left-click on an image in the pane. The location of the images in the Wallpaper for my desktop pane is controlled by the Folder: option. By bringing up this pick list, you can choose an alternate location for the source of your images by navigating to the desired folder and clicking the Open button in the Select a file dialog.
| Alternate location of images |
|---|
 |
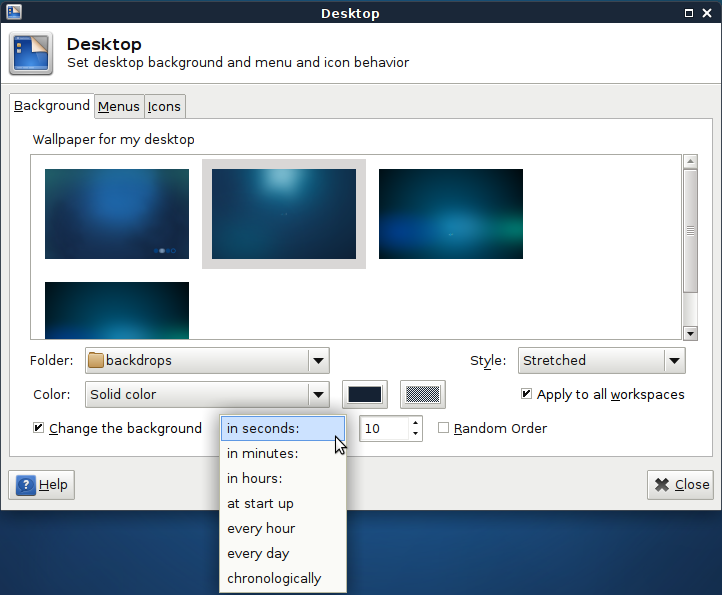
If you choose a location that contains multiple images, xfdesktop also gives you the option of varying the background by switching to each of the images in that location based on one of the criteria in the associated pick list. You can enable this option by checking the Change the background box and choosing one of the following settngs from the pick list:
- in seconds:
- in minutes:
- in hours:
- at start up
- every hour
- every day
- chronologically
If you choose one of the first three options, you can also set the time interval. The Chronologically option will sort the pictures according to filename and then goes through them in their sort order and spread them equally over one day.
Finally, you can check the Random Order box to tell xfdesktop to shuffle the order of the images as it cycles through them.
| Change the background |
|---|
 |
Checking Apply to all workspaces will replicate the Backround settings to all workspaces. Conversely, leaving this option unchecked will allow you to configure different Background settings in each workspace.
Style
The Style: option controls how the image is sized to fit your display. Which option will work best for you will depend on the size of the image and the resolution of your display. Experimentation will be the best guide here. The options in the pick list for controlling the size of the image are summarized in the following table:
| Style Option | Effect |
|---|---|
| None | Don't display an image. See the Colors section for how to display background colors instead. |
| Centered | Centers image in display without resizing. Crops it if larger than display. Preserves aspect ratio. |
| Tiled | Only effective is image size is smaller than display. Fills display with tiled images. |
| Stretched | Reduces or enlarges image to exact height and width of display. Does not preserve aspect ratio. |
| Scaled | Reduces or enlarges image to fit entire image in display. Preserves aspect ratio. |
| Zoomed | Resizes image until it just fills the display. Preserves aspect ratio. Crops image if it doesn't match aspect ratio of display. |
| Style |
|---|
 |
Colors
Background colors can be used instead of a wallpaper image or they can be combined with an image if the image is smaller than the display or is semi-transparent. In the case of a semi-transparent image, the color options can be used to easily change the gradient/hue of the wallpaper. There are four options in the Color: pick list:
- Solid color
- Horizontal gradient
- Vertical gradient
- Transparent
| Background colors |
|---|
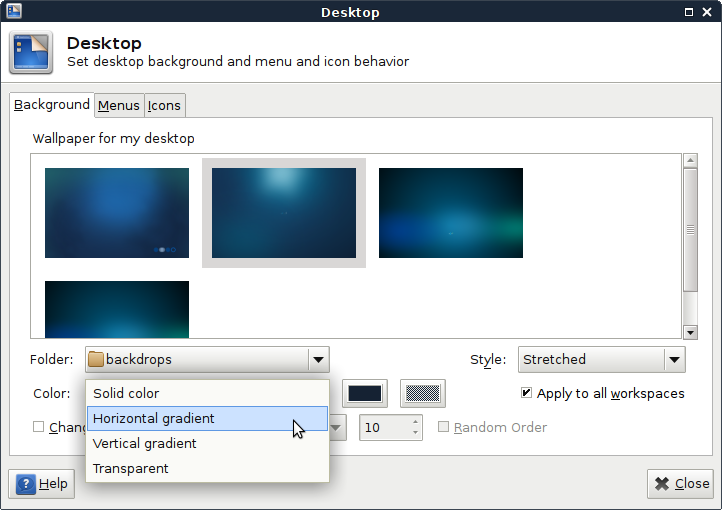 |
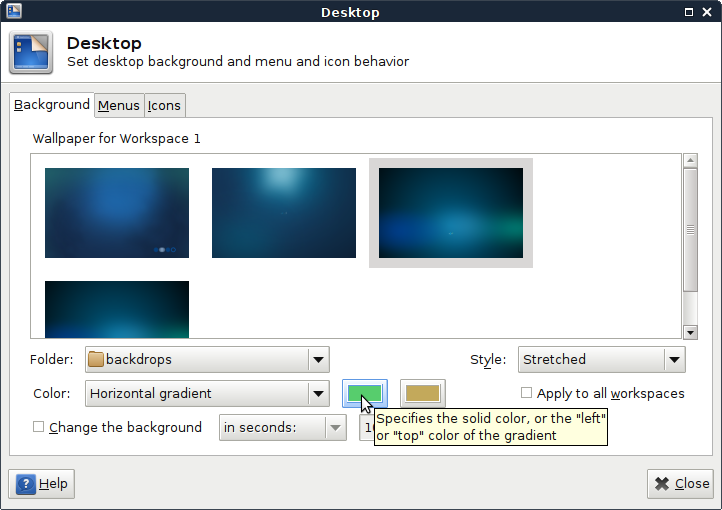
If you choose the “Solid color” option, one of the color chooser buttons to the right of the pick list is active. Clicking that button will bring up a color chooser dialog where you can select a single color to fill in the entire desktop.
If you choose either of the “gradient” options, both color chooser buttons become active. Hovering over the color buttons with the mouse will show a tooltip which explains which section of the screen that particular button will control with the gradient.
| Gradients |
|---|
 |
Menus
To configure your desktop menus behavior, open the Desktop Settings and click the Menus tab.
| Menu tab |
|---|
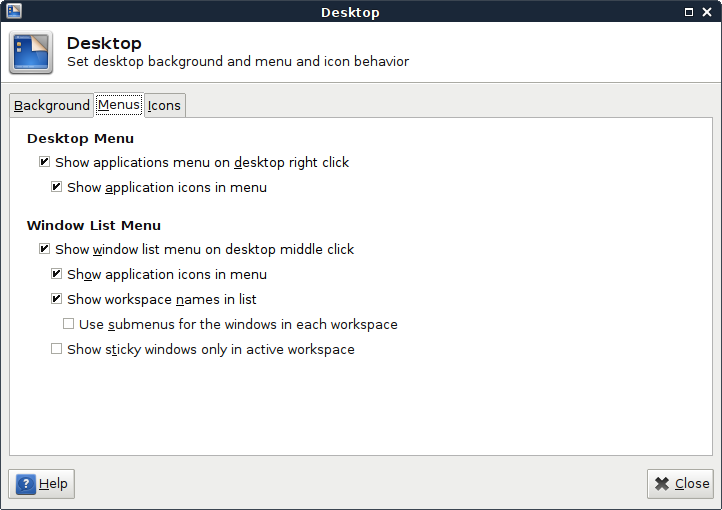 |
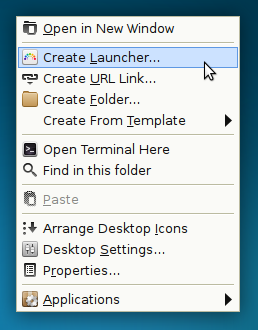
Desktop Menu
A right-click on the desktop backdrop opens a menu that allows you to open a Thunar window in the Desktop directory, to create launchers, URL links, folders and files from templates. It is also possible to open the Desktop Settings and the Properties window of the Desktop directory and to start many of the applications found on your system.
If you check the Show applications menu on desktop right click option, the Applications menu entry will be shown at the bottom of the list when right clicking on the desktop.
Ticking the Show application icons in menu option will show icons next to the text in the Applications drop-down menu.
| Desktop menu |
|---|
 |
$sysconfdir/xdg/menus/xfce-applications.menu. For binary packages, $sysconfdir is often /etc and for source compiles, it defaults to /usr/local/etc.
xfce-applications.menu to $XDG_CONFIG_HOME/menus and by modifying it with a text editor such as mousepad or gedit. Please remember that the file should be UTF-8 encoded. For more information on menu editing, please see the Xfce Wiki.Further customization can be achieved by creating desktop entries in
$XDG_DATA_HOME/applications to hide, modify or add entries in the menu.
Window List Menu
A middle-click on the desktop backdrop shows a list of all opened windows ordered by workspace. It also allows you to add or remove a workspace.
| Window list menu |
|---|
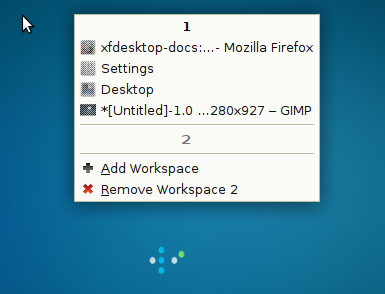 |
Checking Show window list menu on desktop middle click will enable a popup menu of workspaces and their windows when the middle mouse button is clicked on the desktop.
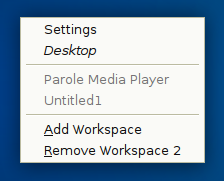
If none of the subchoices are checked, the popup menu will look like the following example:
 Checking Show application icons in menu will produce the following:
![]() Adding Show workspace names in list and Use submenus for the windows in each workspace will yield:
Adding Show workspace names in list and Use submenus for the windows in each workspace will yield:

Check the Show sticky windows only in active workspace option if you only want to see those windows in the active workspace instead of all workspaces.
Icons
In addition to drawing the backdrop image, xfdesktop can also draw icons on the desktop, allowing you to control their appearance and behavior.
To define the appearance of your desktop icons, open the Desktop Settings and click the Icons tab.
| Icons tab |
|---|
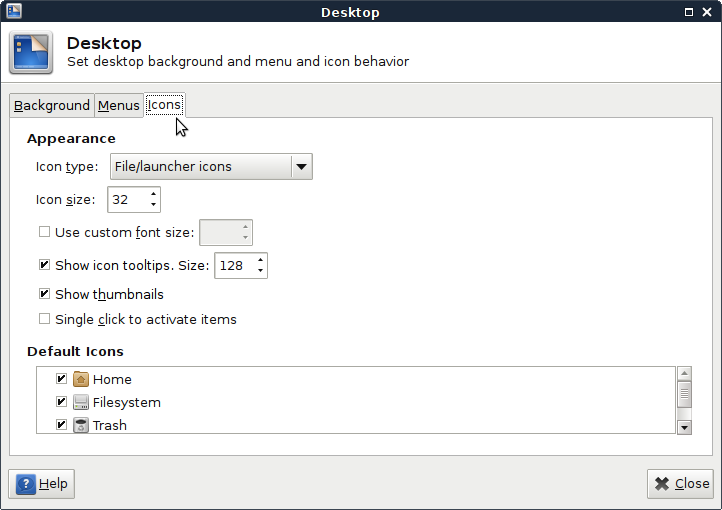 |
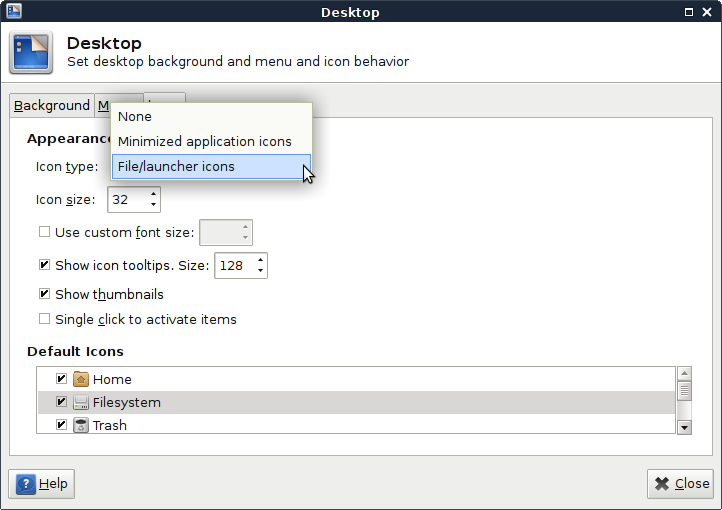
You can either choose to have a icon free desktop, selecting the None option from the Icon type: picklist for the effect, or choose to populate your desktop with icons, in which case you have two possible options available for you, Minimized application icons and File/launcher icons.
| Icon type |
|---|
 |
None
Selecting this option means that all desktop icons are disabled entirely.
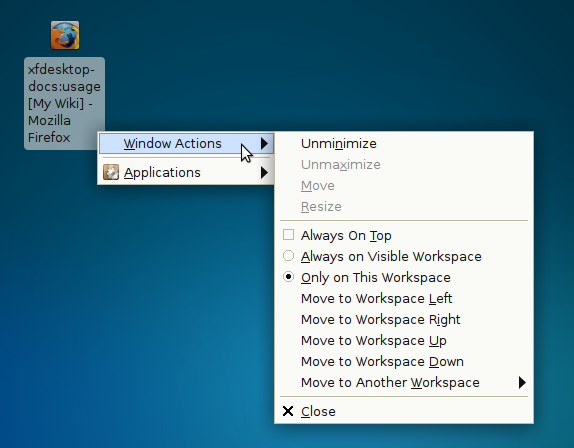
Minimized Window Icons
When the Minimized Window Icons option is chosen, the icons are displayed as minimized applications on the desktop, which can be rearranged, and will remember their positions when the window is unhidden and then later minimized again. The icons also provide a right-click menu similar to the window's control menu accessed by clicking the button in the top-left corner of the window.
| Minimized Window Icons |
|---|
 |
File/Launcher Icons
Choosing the File/Launcher Icons option means that your files can be arranged, copied, moved, and linked to and from a file manager, and opened using preferred applications. Application and URL launchers can also be created on the desktop. The file icon view is modeled to have a similar look and feel as the Thunar file manager.
| File/Launcher Icons |
|---|
 |
$XDG_CONFIG_HOME/user-dirs.dirs file (if you do not have this file, it will use $HOME/Desktop)
When you choose one of the given options to enable icons on your desktop, you can control the size of the icons, the font size used to display the icon text and whether or not you want to show or hide their tooltips which are displayed by hovering over desktop icons. Please refer to the Preferences section on how to setup those values.
You can also choose to have thumbnails visible on the desktop just as they are in the File Manager and opt for a single click to activate items thus making files to open and launchers to be executed with a single click, ticking the respective check boxes for that effect.
| Thumbnails and single click activation |
|---|
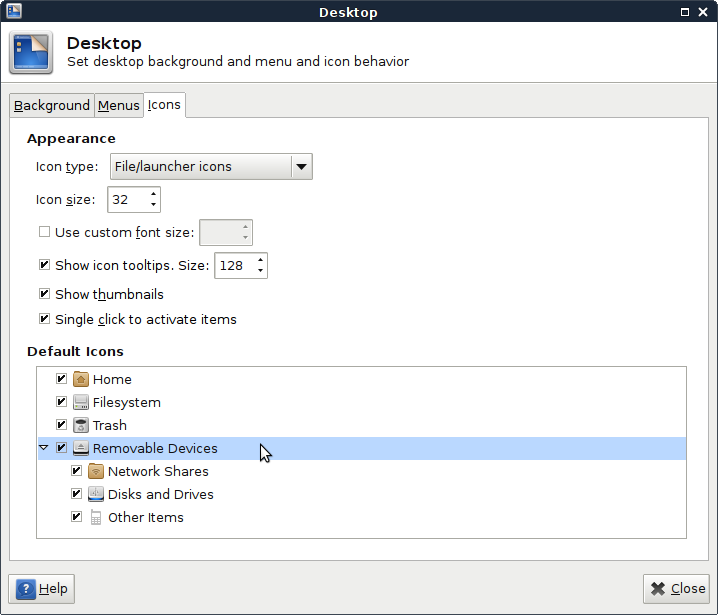 |
If you want to show or hide special icons on your desktop, like your / folder, your /home folder or any removable devices you might have attached to your system, like network
shares, disks and drives, and other items all you have to do is to select them, by ticking their respective checkboxes under the Default Icons option.
Double clicking those icons on the desktop will open a File Manager window displaying the contents of a particular path.