Preferences
The Xfce Panel Preferences dialog gives you the ability to customize your panel. You can change the size, appearance, and orientation of your panels. You can also add or remove extra panels on your desktop.
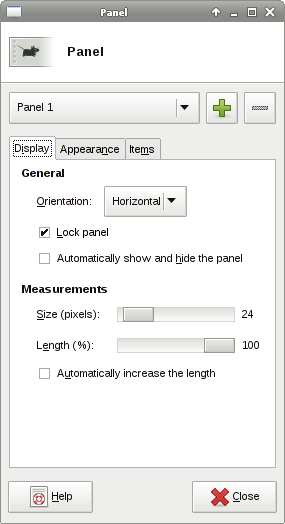
| Panel Preferences Dialog |
|---|
|
Accessing Panel Preferences
The panel preferences can be opened by going to Settings → Panel in your applications menu. You can also access panel preferences by right clicking on your panel and going to Panel Settings. If you right click on space occupied by a panel plugin, you can access panel preferences by going to Panel → Panel Preferences....
Selecting a panel
You can select a panel from the drop down list at the top of the dialog. Next to this are two buttons that can be used to remove (-) the currently selected panel or add (+) a new empty panel.
The panel selected in the dialog should also show a selection around the panel, so it is clear which panel you are editing.
Display
This tab hold the settings how the panel is positioned on the screen.
General
? Mode ! Set the panel mode to horizontal, vertical or deskbar. In the deskbar mode, the panel is oriented vertically, just like in the vertical mode, while panel plugins are laid out horizontally. This mode works best with “number of rows” set to 2 or more. ? Output ! Select the output (such as an secondary monitor) on which this panel should appear. If the output is not connected, the panel will not be shown. ? Span monitors ! If you have multiple monitors connected to the computer, this option will appear in the properties dialog. This will tell the panel to stretch across multiple monitors instead of only being restricted to one monitor. It look at the total screen size instead of the size of an individual monitor. ? Lock panel ! Don't show the handles on the panel which allow you to move the panel. When this option is disabled, you can drag the panel anywhere you want on your screen. The panel will also snap to the edges of your screen. ? Automatically show and hide the panel ! Automatically hide the panel if the mouse is not hovering over it. ? Don't reserve space on borders ! Normally, maximized application windows do not overlap the panel. Setting this option disables this behavior and allows the windows to stretch to the screen edge.
Measurements
? Row Size ! Change the height (or width, if the panel is in the vertical or deskbar mode) of the single row of the panel. The total panel height (or width) is equal to the “Row Size” × “Number of rows”. The size is specified in pixels. ? Number of rows ! Change the number of rows (or columns, if the panel is in the vertical or deskbar mode) of the panel. Small panel plugins, such as launchers, will be laid out in multiple rows (or columns), while larger ones, like window buttons will continue to occupy the whole panel height (or width). ? Length ! Change the width (or height, if the panel is in the vertical or deskbar mode) of the panel. The size is specified as a percentage of the width (or height) of the monitor screen. ? Automatically increase length ! Increase the length of the panel length to accommodate all the plugins. This option is useful for setting up short panels, which expand as the panel contents changes.
By default the panel distributes the plugins from left to right (or from top to bottom, if the panel is in the vertical or deskbar mode). However, it is possible to align plugins to the center to the right (or bottom) of the panel by inserting an expandable separator to the left (or above) these plugins. By inserting two or more expandable separators it is also possible to position plugins at the center of the panel.
Appearance
This tab contains the style settings of the currently selected panel.
Background
? Style ! This allows you to change the transparency, color, and background image of the panel. You have three options to choose from.
? None (user system style)
! The panel inherits colors from the currently selected GTK+ theme. You can view and change the current GTK+ theme by going to {gui>Settings>Appearance}.
? Solid Color
! You can select a color using the provided color picker. The color you select will be applied to the panel.
? Background Image
! Select a background for your panel.
? Alpha ! Change the alpha transparency of the panel. Some panel plugins may still retain a non-transparent background. This option is only available if your panel style is set to None or Solid Color. !
? Color ! Clicking this activates a color picker. You can select a color by using the color wheel, entering a hex value, or entering a color name. This option is only available if your panel style is set to Solid Color. ? File ! This allows you to select a background for the panel using a file browser. This option is only available if your panel style is set to Background Image.
Opacity
These options set the transparency of the entire panel.
? Enter ! This controls the transparency of the panel when a mouse pointer is not hovering over it. Ranges from 0 (fully transparent) and 100 (fully opaque). All panel plugins will be affected by this setting. ? Leave ! This controls the transparency of the panel when a mouse pointer is not hovering over it. Ranges from 0 (fully transparent) and 100 (fully opaque). All panel plugins will be affected by this setting.
Items
This shows the items that are placed on the currently selected panel. In case items are hard to move or edit on the panel using the right-click menu, this tab allows you to move, add, remove and access the preferences of the items on the panel.
This tab contains a row of buttons that allow you to manipulate the items on the panel.
With the up and down buttons you can move the currently selected item in the panel.
The add button opens the add new items dialog. With the remove button you can remove the currently selected item from the panel.
The preferences and about buttons are only active if the plugin support these features. It will open the selected items' settings.
Only limitation in this dialog, compared to mouse handling, is that you cannot move items between panels and access custom menu items a plugin can add in the item menu.